一、当分支机构需要连接总部的内网
分支机构因员工数量较多建议采用设备拨入,利用路由条目只转发需要的数据,提高办公效率;
二、在外员工临时使用【下面会介绍win10{第A项}和win7{第B项}利用系统内置隧道客户端的配置方法】
请先确认公司 SSTP接入地址: (请咨询管理员)
{当SSTP拨入失败时,请尝试使用L2TP方式拨入,可使用预共享密钥的L2TP/IPsec,预共享密钥为: (实际密钥请咨询管理员) 注意拨入地址为 (请咨询管理员)}
员工个人电脑使用此方式拨入时,不建议进行大量下载和视频需求,以减轻总部互联网压力;如果长期使用,请使用下面第三种方法。
三、经常出差员工或者居家办公长时间使用时,参考下面文档{第C项};
建议使用频繁的用户,安装下面专用客户端软件,可实现自动分流,避免所有流量都转发至总部,影响总部的互联网出口带宽;
第(A)项 win10配置隧道的方法:
1、点击左下角 “开始” 图标

2、点击 “设置”按钮 进行设备菜单

3、点击“网络和internet”

4、点击 “VPN“

5、点击 “添加VPN”

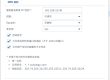
6、按照下图说明填入账号等信息,并保存

7、选择刚才建立的VPN ,点击 “连接” 显示“已完成” 则VPN拨入成功。

8、连接后 所有流量均转发至总部网络,因此大量下载和观看视频时建议断开VPN连接。(自动分流除外)

第(B)项 win7系统配置隧道方法
首先、右键点桌面右下角的网络连接图标,选择网络和共享中心,进入到网络和共享中心窗口。(也可以右键点击桌面的网络图标,选择“属性”)

第二步、按下图所示,选择设置新的连接或网络。

第三步、在下图框中,选择“连接到工作区”。

第四步、选择 “使用我的Internet连接(VPN)”

第五步、填上VPN服务器的地址: (请咨询管理员获取地址) 按图所示 选择“现在不连接;仅进行设置以便稍后连接”

第六步,填上亮点网络提供的账号密码,在“记住此密码”前打钩。

第七步、到这一步,VPN连接已经创建成功。点击“关闭”,修改连接方式后再去连接。

另外,我们再来介绍下一些VPN连接的高级设置。
1、打开VPN连接。如下图所示,点击“属性”按钮。

在常规选项卡里,可以修改VPN服务器的ip地址或域名。

在安全选项卡里,我们可以设置数据加密为“可选加密”,避免因为加密类型的错误导致VPN拨号741、742错误。

在安全选项卡里,还可以设置VPN的类型、默认为自动,我们可以指定为我们想要使用的协议,比如PPTP、L2TP、SSTP等。当前首选使用SSTP
直接指定可以节省自动轮换协议拨号的时间。

设置好以后,点击确定即可保存设置。
以上就是WIN7创建VPN连接的具体步骤。
接下来,创建快捷方式到桌面,方便以后使用。
1、进入网络和共享中心,如下图所示,点击左边导航的“更改适配器设置”

2、进入到网络连接窗口,找到刚刚创建的VPN连接,右键点击它,选择“创建快捷方式”!

弹出的快捷方式窗口,选择“是”。

.
经过以上操作后,你的电脑桌面上就已经成功创建了一个VPN连接的快捷方式,以后使用只需要直接在桌面上选择这个VPN进行连接。
第(C)项 使用客户端软件建立隧道
软件下载地址:
Windows [7, 8.1, 10, 11, 2008R2, 2012R2, 2016, 2019, 2022 – v0.5.3]
https://www.siwenlide.com/wg/wg.zip
macOS v1.0.15
https://itunes.apple.com/us/app/wireguard/id1451685025?ls=1&mt=12 (App Store)
Ubuntu
$ sudo apt install wireguard
- 下载后安装此软件,点击“从文件导入隧道”,将管理员提供的 ***.conf 文件导入软件;

-


- 单击“连接”,进行加密拨号连接,稍后连接成功后利用ping命令检查是否成功 ;